To get the most out of your Teeter, it’s important that you feel comfortable with how to use an inversion table. To that end, Teeter Inversion Tables are designed to be super easy to use! We want you to have a smooth and effortless inversion experience so you can relax and feel the benefits. Here’s a brief summary of how to set up your Teeter and make inversion therapy and back pain relief easy to achieve. (IMPORTANT: Before use, refer to the Owner’s Manual that comes attached to your Teeter Inversion Table for a full explanation of how to personalize the adjustments, properly secure your ankles, test your balance, and properly rotate into and out of inversion.)
How to Set up a Teeter Inversion Table
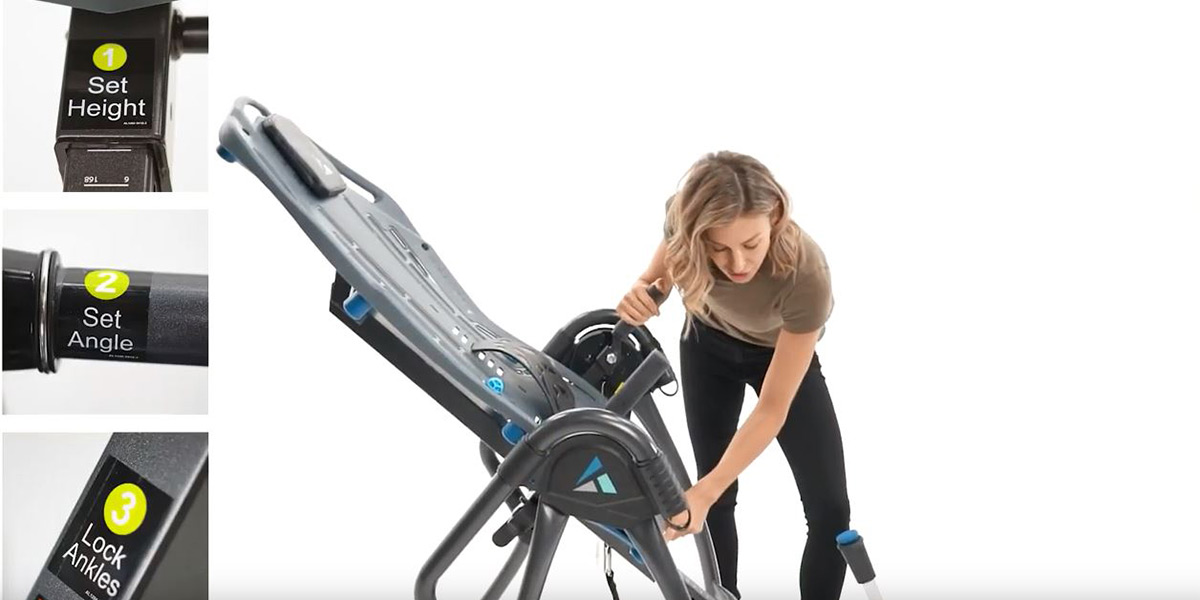
1. Set Height – Use the spring-loaded locking pin to select your height on the main shaft. Note that the height settings are just a guide to get started – your actual height setting may vary by several inches depending on your weight distribution. We recommend starting at 1″ taller than your actual height, then testing your balance before settling on your ideal setting.
2. Set Angle – Use the tether strap to limit your angle of inversion (this is important when you are just getting started) or remove it for full 90-degree inversion. Some Teeter models feature an EZ Angle Tether with markings to pre-set your inversion angle to 20, 40, or 60 degrees, but all can be micro-adjusted to the perfect angle for you. When starting out, limit your angle to somewhere between 20-45 degrees, then gradually increase that angle over time as you become more comfortable.
3. Lock Ankles – Carefully step over the Main Shaft. With both feet on the floor, sit/rest your lower body on the bed (do NOT lean back yet).
- Step onto the foot platform one foot at a time. If needed, adjust the back of the cushioned ankle supports so they wrap around your ankle.
- Close the ankle closure to secure snugly around the ankles (this will vary by type of ankle closure). Read More: Compare Teeter Ankle Lock Mechanisms
- Use the ‘Hear, See, Feel, Test’ method to ensure you’re properly secured.
Teeter Inversion Tables come with labels on the equipment to remind you of these important steps each time prior to inverting. It’s very important that every user in the household become familiar with their own ideal settings and ensure the inversion table is properly adjusted EVERY TIME prior to inverting.
How to Use an Inversion Table
1. Precision Balancing is a phrase we don’t take lightly around here. Teeter Inversion Tables are designed to adjust for every body type, meaning that with a little bit of testing, you will be able to find your ideal settings and have total control over your speed and angle of inversion with just simple movements of your arms. The secret behind Precision Balancing is the ability to distribute weight evenly on each side of the pivot point.
- If your rotation is too aggressive and you are having a difficult time returning upright, then lengthen your Main Shaft and test again.
- If your rotation is not aggressive enough, then shorten your Main Shaft and test again.
- If you want to adjust the responsiveness or speed of rotation, consider your 3-hole hinge setting.
The Owner’s Manual that comes attached to your Teeter offers clear guidance to finding your ideal settings and testing with a spotter until you have it just right for you. Read More: How to Adjust Your Inversion Table’s Responsiveness
2. Just relax! The beauty of inversion therapy is that gravity does all the work for you. To get the full benefits of decompression, focus on breathing deeply and relaxing the muscles in your back. It may help to visualize the back muscles releasing with each breath.
3. Oscillate. Once you’ve balanced the table to your perfect setting, you can easily oscillate, or rock, up and down. This helps get fluids moving to rejuvenate and hydrate the discs in the spine and weight-bearing joints. Plus, many people find it very relaxing and meditative.
4. Grip-and-Stretch. Add manual traction and leverage to help to deepen your stretch. Teeter FitSpine Inversion Tables feature grips in the FitSpine bed and frame that help you twist and deepen your stretch, and some models even include Traction Handles to add more traction (which is especially great for people who want to invert to shallower angles but need a little extra decompression).
5. Full Inversion. Teeter allows the option to invert at full 90 degrees lock-out; a fun and effective way to add additional stretching, movement, and exercise to your inversion routine. We recommend avoiding full inversion until you’ve had the chance to invert over several weeks and get completely comfortable at 60 degrees (the angle of the rear legs). Some people never want to fully invert, which is just fine, but you may surprise yourself over time! Just listen to your body and only do what is comfortable for you.
How to Use a Teeter Inversion Table for Exercise
While fully inverted, your body hangs freely from the table bed, giving you freedom of movement for stretching and exercise. Depending on your body type, you’ll need to set your 3-Hole Hinges in either the A or B setting to achieve secure lockout.
- Start with basic stretching. Tilt your neck from side to side. Do cross-body stretches with your arms. Use the frame to perform spinal twists. Press your hands into the top of the table bed and arch away to do a back extension and elongate the abdominal muscles.
- Add gentle movement. Circle your head and hips. Tilt your pelvis front and back. Arch your body from side to side. Grab onto the handhold in the frame and give your hips a gentle shake.
- Strengthen your core and legs. Crunch forward and tighten your abdominals. Engage your obliques by crunching to the sides. Work up to full-range sit-ups (the only kind that doesn’t load your lower back). Bend the legs and lift your body for reverse squats that sculpt your legs and glutes.
- Read More: How to Exercise on Your Teeter
How to Return Upright from Inversion
Teeter Precision Balancing allows you to return upright just as easily as reclining into inversion (as long as you’ve found your ideal settings, see above).
If you’ve inverted at 90 degrees, first pull the table back towards you from its locked-out position. Let your body settle at 60 degrees for a second.
Slowly bring your arms to your sides. You should begin to rotate upright. STOP and rest at just short of horizontal – this allows your body to “re-compress” gently and helps avoid sudden compression to any injured areas.
If you do not return fully upright with just the weight of your arms, remain relaxed and DO NOT lift your head. Simply bend your knees and slightly scoot your body to the foot side of the bed (your weight may shift somewhat while inverted and doing this helps move more weight to the other end of the table). If you still have trouble returning fully upright, consider re-testing your balance settings.
Watch CEO Rylie Teeter demonstrate how to easily invert on a Teeter FitSpine Inversion Table:
Millions of people have found natural back pain relief with Teeter. Teeter is the only inversion table on the market that is FDA-Registered as a 510(k) medical device and Safety-Certified for upholding UL rigorous security standards. In just minutes a day in your own home, you can find relief with Teeter and begin your recovery journey.
Get Real Back Pain Relief
Join over 3 million people who have found real back pain relief with Teeter.
Contraindications
Like any new treatment program, consult with your doctor before you invert. It’s important to discuss your personal needs with your physician, especially if you have or experience any of the contraindications.